Showing posts with label wip. Show all posts

May 27, 2016

Useables! And my first Zine.

Here ya go. Have some free snaps and textures to do with as you please. For personal or business use.

Me? I'm made a quick Zine. Pulling some random selections from one of my 2015 sketchbooks. Which include some pics of snack wrappers and paper ephemera. I glue all sorts of dumb things into my books.


You have my full permission to use these images for your own project. Do whatever... Just go make something!
Show me and I'll feature your work here or on Facebook.
I'll even trade you Zines.

Like em? Want more? Let me know in the comments and every once in a while I'll toss a few up.

Oh yeah... Zine how-to here.
UPDATE: When using the template instructions in the link. Revers the "front page" and "back page" positions. otherwise your Zine will open in reverse.


June 17, 2015

Painting Sketchbook

For the longest time I've wanted to learn how to paint. Not just fumble around in the dark. But to really learn a practiced technique. Or at least become acquainted with one. 
For the longest time fear and over saturation got in the way of picking up a brush. Desperation began to set in as years rolled by with out dedicated action. There were too many false starts to count. Book after book went on the ol' Christmas list and YouTube videos played till my eyes bled.
Painting was always just a dream.
Odd isn't it? To have such a crippling fear of a medium. At the time it wasn't odd. But as I stand here now, typing this, remenicing back to those moments. It's all becoming laughably strange. And the path is still so new.

One fateful Christmas, a husband stepped in. He got me the  gift of a schoolism oil painting class with Tomas Fluharty, a master in the Dutch/Flemish style. 
That was for Christmas and the supplies were for the "push present".
Ladies... if you don't know what a push present is, then quickly school yourself! And log it away in your gift receiving calendar.

Two pieces were done...
First, to shake hands with the monochromatic under painting process.


Then we did the whole thing again and took the second piece through the color and correction stages. Unfortunately, it's taken more than a couple tumbles. And somehow... I got white paint on his snooter. Not a even the hint of a clue as to when it happened. The thing's been up on the wall for ages. A constant wonkey reminder.


Walked away with an "Excellent" from the class. Which, if I remember correctly is like a 4 out of 5 score. But me thinks Mr. Fluharty (who was a great teacher!) is just a kind person. Compared to most of the others in the class my work was a solid 3 at best! AT MO-FEGGIN BEST! Maybe a 2.5 / 2.75 as I stand here eyeing the two paintings now.
Regardless, once a direction of study was had, most fear was lost. Then a skin allergy to the paints developed and everything stopped for a couple years.


She mentioned they were produced using slow drying acrylic... One that worked similar to oils.
The game was back on! 

But an instagrammer by the name of @sirenitadolls refurbished hope. When she began posting her works. And she mentioned they were produced using slow drying acrylic... One that worked similar to oils. Golden Open Acrylics. 
Oh-ho-ho the game was back on and two sets were slapped on the ol' Amazon wish list. Awaiting the gift giving season. I was not let down.
Thanks bro and sis in-law!


Best rescue to date. Thanks hoarder instincts!

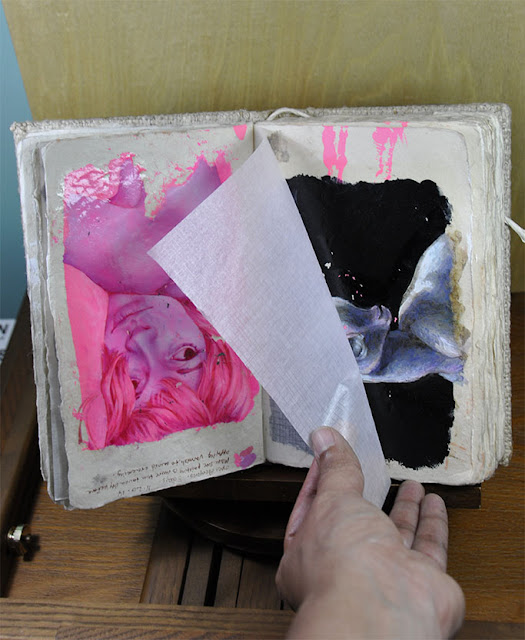
Here we are. New paints, that don't erupt sensitive flesh in to hives. And a nice sketchbook with thick handmade paper to use as a practice book. Rescued it from the trash bin at a previous job. Best rescue to date. Thanks hoarder instincts!

A ding dang toddler pulled the button off the page marker. I'll reattach it one day. Toddlers... 


Tried to make it a point to write down the amount of time taken, brand of paints and techniques used.
I.E. 1 Hour / Under painting / Glaze or Direct painting.

11-26-13 Regular craft acrylics, Direct Painting, 2 Hours
These two, I was toying with atmosphere
12-5-13 Regular craft acrylics, Direct Painting, 1 Hour

10-15-14  OPEN acrylics, Under Painting / Glaze, (no time)
Tried to figure out cool tones with hot lighting angle edges.
10-16-14 OPEN acrylics, Under Painting / Glaze, 5 Hours


10-22-14 OPEN acrylics, Direct Painting, 1 Hour 20 minutes
Focused on cool cast light. And warm reflective light.
Just to address the fact of there being three unicorns of a similar pose... I was also experimenting how to handle a painting of the floral unicorn sketch that was done so long ago. Hadn't a clue how to tackle white fur. We'll see if it happens. I'm so G D flighty, things get abandoned for long periods of time.

Carry on.

10-24-14  OPEN acrylics, Under Painting, 2 Hours 30 minutes

OPEN acrylics, Under painting, No date, no time. 

11-20-14 OPEN / craft acrylics, Under painting, 3 Days
This is the photo taken the day of completion.

Real quick... 

A cautionary tale.

After each page was done and dried for several weeks. I'd finish it off with a coat of Golden high gloss glaze. Let it dry for several days between glazing and put the book away. Things were cool. It would come off the shelf for this n' that or to be scrutinized harshly from time to time. Until one moist, tacky floored humid day. I took it down and found it glued shut! Particularly the pink lady page. As she got the thickest coat. Devastation, rage and heartbreak were all the feeling that welled up at once.

After a couple days of moping about it, I remembered a stack of scrapbook page inserts that'd been laying around. Again, saved from the trash. Snagged em from a warehouse clean-out several years ago. Never had a single use for them... I don' even scrapbook. Want to, but never will. Who'm I kidding?! Only myself.
They just sat in a box, not a single use to be had. Till that moment. These pages have a "wax paper" like dust sheet. Ripped those suckers off, cut them down and glued one between each used page. And haven't had a sticky problem since.
Bullet dodged!

By the way, I did refrain from showing two pages. Why?... Because I don't like them and you're subject to my whims and rules! Nya'hah!


May 20, 2015

Learned something after a recent flea market scavenge.

Remember in the old silly symphonies (or was it Looney Toons) how Goofy (or was it Bugs?) would take out a pencil and give it a teasing lick before writing? When I was a kid, I always wondered why cartoon characters would lick the tips of their pencils. I asked my mom and she she had nothing for me. Eventually I settled on it simply being a gesture of initiating concentration.
But, could they have been using these pencils?


At our last Flea market scavenge I picked up this box of old pencils. Thought "Hey, cool. Old drafting pencils!" We once found a box of old dip pen nibs. Most of em are completely usable!
Plus, I think it was just $2 for a full unused box. So why not!
Got home and took a closer look.

Indelible copying pencil?... What does that mean. Quick to Google!
Blah blah... Used for making permanent signatures "ok, cool."... Blah blah... Turns purple when dampened "Wow, that'll be fun!"... Blady blah blah... Acne, lung problems "WHUT! What did I just buy a whole box of?!"

As Wiki has it...
Or, if you don't care zoom down to the bottom for an example sketch and video.


Copying pencil

copying pencil, also indelible pencil, is pencil whose lead contains a dye. The lead is fabricated by adding a dry water-soluble permanent dye to powdered graphite—used in standard graphite pencils—before binding the mixture with clay.[1][2]
Copying pencils were introduced in the 1870s, and were originally marketed for copying documents, especially for making permanent copies of a permanent original. This was achieved by creating a hand written document using a copying pencil, laying a moist tissue paper over the document and pressing down with a mechanical press. The water-soluble dye in the writing would be transferred in its mirror-image to the tissue paper, which could then be read in verso by holding it up to a light source.[1] According to conservationist, Liz Dube, "By the 1870's, letter copying books became the ubiquitous copying tool for businesses. These volumes contained hundreds of leaves of thin tissue paper, often high quality Japanese papers, bound together for the purpose of bearing copies of outgoing correspondence and other business documents."[1]
The most commonly used dye was aniline which produced a stain that was bright purplemauve, or some color in between, depending upon the manufacturer. Since the aniline dye was poisonous to humans, many injuries and illness related to copying pencils were reported in the medical literature, especially in the late-19th- and early-20th centuries.[2]
By the end of the 19th century, better copying methods had become available. Consequently, the copying pencil was being used as an indelible pencil, a precursor to the ball-point pen. When used dry, it left a slightly-purplish gray mark on paper, not dissimilar to a lead pencil's, but which could not be erased.[1] When used wet, its tip moistened repeatedly by water or saliva, it produced a bright purple writing. The copying pencil served as a convenient substitute for the fountain-pen: it could be carried on one's person without need for ink or fear of leaks.[1] Furthermore, for producing copies using carbon paper, copying pencils were considered superior to both ordinary pencils (whose writing in the original could be erased) and fountain-pens (whose nibs could not always withstand the pressure needed to produce the carbon-copy).[1]
Copying pencils saw extended use in World War I in the completion of a wide range of paperwork. However, with the advent of refined ball-point pen technology in the 1930s, their use gradually died off in much of the world.[1] They saw longer use in some places. In India, they were commonly used for writing addresses on registered mail parcels which were required by law to be wrapped in cloth. For writing an address on cloth, a moistened copying pencil was preferred to a pen, whose nib could easily get caught in the weave. In Italy, their use is still mandated by law for voting paper ballots in elections and referenda.[3] During their heyday, copying pencils were also associated, across the world, with the image of a railway conductor, who famously carried one tucked behind an ear.

Health risks

Indelible pencils were the cause of significant health risks due to the presence of aniline dyes. Exposure to aniline dyes could lead to eczema, acne and carcinoma. Penetration of the pencil lead into the body commonly leads to severe and debilitating effects such as fever, anaemia, elevated white cell count, gastro-intestinal upset, kidney and liver damage, anorexia and necrosis of the tissue surrounding the wound. Such risks are not associated with ordinary graphite pencils. While these symptoms may appear after a couple of days they often develop only after weeks have passed since the injury was sustained. Surgery is required to remove the lead and the infected tissue and "the necrotizing action may be so severe and extensive amputation is necessary".[4]

Ok great, I have a bunch of pencils I'm afraid to use... But they might be the answer to my childhood question. "Mama, Why does Goofy lick the end of his pencil before writing?"

October 27, 2014

Take a walk-through with me. NSFW, by the way.

So, how about a progress walk through for Behold, God? You game.

TLDR gif for your convenience.


To kick off, here's something you might find surprising about this work. Its concept came about when I saw this photo by Vaxzone on Deviantart.


Can you see the connection?
Maybe if I show you the way I saw it... It was actually due to miss interpreting the negative space and colors. 

Here's what happened.
I was digging around DA for something... No clue what the search was about at the time. It's been long forgotten at this point. When a glance was stolen at a thumbnail image hiding in the "More from" column. My sight is so poor that when my attention fluttered by, I saw a lanky limbed woman seated on a throne of clouds. Took a second glance and saw the image correctly. But the idea had been sparked. So a screen capture was taken and a fast doodle was thrown down as a reminder of what I saw. Ultimately to be filed away for a later date.
Thankfully the open call from Slushbox dropped in my lap at almost the same time. Which pushed the concept into production, instead of allowing it to languish in forgotten files.
Like most "flash of inspiration" ideas. 

Concept sketch.
Working sketch.
Usually, as I'm working I'll find images to cobble together to help build the idea as fast as possible. 
Rather than laboring exhaustively over a small piece or humoring an idea for hours that might not work out. 
I have such a short attention span and tolerance for difficulty that I tend to drop a project for months at a time if I get stuck evaluating all possibilities. This generally happens while working out poses and compositions. 
It turns into a flurry of "oh what if the arm was nudged a little this way?" or "maybe it'll look better nudged just a little more. Or maybe the other way." and "what if it's just switched around?" to "how about dropping it down instead" and again "let's nudge it this way, now the other way... How about up? Maybe it looked better the way it was before." Over and over and over. Till the options get so confusing I don't know what's going on anymore. The biggest danger is potentially  loosing sight of what you really wanted in the first place. 
So by "clip art'ing" I can at least see if a supporting idea or object will work out, right away. For me, it's about keeping things moving as smoothly as possible in the early stages or I'll just throw my hands in that air an walk away to go pout.
I believe there's a term for it, Analysis paralysis.


I think this one comes next...
Or maybe this one... See, the changes are so minimal that I can't even remember which version was actually saved first
.
The original concept wasn't working and caused too many headaches. It was time a for a redraw. Above is a Photoshop colorized sketchbook page. 

It was also time for a redraw and tightening of the "Goddess"

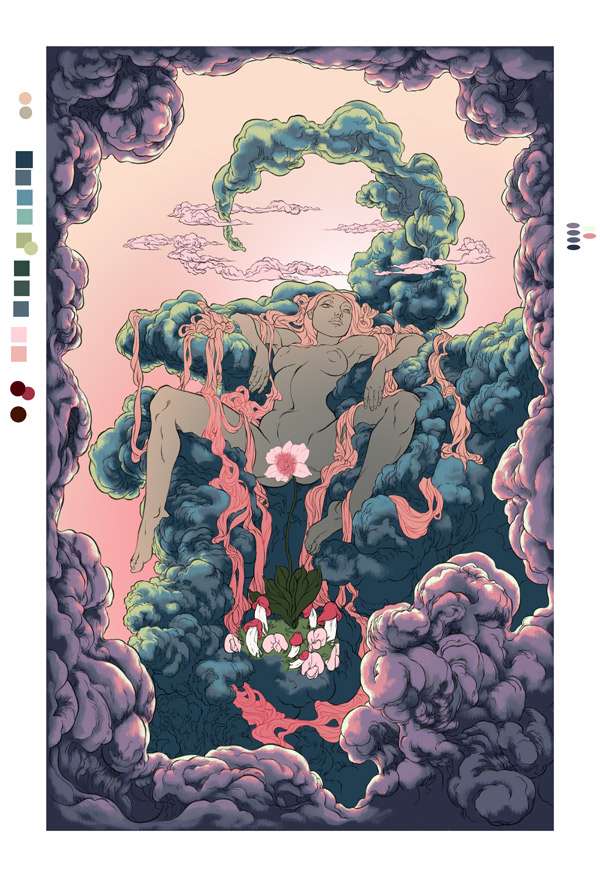
Everything's coming together. Chunky flat colors will get thrown in for readability.
Plotting paths for hair cascades.
Taa Daa!
Blocking in the midtones and highlights.
Let's try something out here.
Color palettes are always a challenge and will change several times.
At this point the sketch is finalized and ready for penciling.

                                       
LIGHTBOX TIME, GO!
To get all the line work detail wanted, the image was divided into four separate sections. Penciled, scanned and reassembled in Photoshop.

The shading seen above was done on as a separate component and scanned after the pencils. I like to keep the two separate just have on hand if I ever want to work with the image in a different medium. It's likely the most confusing, work intensive and an all together busted way to work, but at the time it felt like the most "medium open" option. 
If you think that's in any way pointless then you should see the maddening way I handle my Photoshop files.
More color adjustments.
Till we get something a little more unconventional. At least I felt so. Still playing around with the rays of light till it was decided to just stop fighting with it and go with the simplest effect


That pretty much runs through the whole thing. 
Thanks for walking with me. Next time I'll try to keep my hands to myself. Promise.